
The good news is you don’t have to be a whirling dervish to tie lots of flies. Speed comes of its own by spending time at the vise. It just happens. Not to split hairs, but more important than raw speed is productivity, which comes first and foremost from the organization.
Set Up a Killer Tying Bench
If possible, set aside an area in your home just for tying flies and leave it set up. Sometimes you can spend more time setting up and searching for the materials you’ll need than actually tying.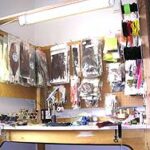 This may be the single most important tying tip I can suggest when it comes to actual production. It has the huge added bonus of allowing you to spend small bits of time tying flies which would otherwise go untied (since that small bit of time would otherwise be eaten up by set up and searching for materials).
Make sure your tying bench is very well-lit. Bad lighting will slow you down tremendously.
Tie Your Flies in Large Lots
Beginning fly tyers will often tie one fly at a time, then switch to another pattern. I understand the urge, I used to do it myself, but it was not very productive.
Try to tie at least three or four (of the same pattern and size) at a time. A dozen is even better.
Not only will you save time by using an assembly line approach, but your flies will also be of higher quality because you get better with each successive fly. It takes a lot of experience to tie high-quality flies while constantly switching patterns.

Organize Fly Tying Materials Before Tying
Before beginning to tie a fly, lay out all the materials you’ll need for that pattern in a semi-circle around your vise in the order the materials will be used. With my materials laid out, I like to  work from left to right.
In the photo on the right, the materials to tie a Tarantula are laid out from left to right…golden pheasant tippets for the tail, yarn for the underbody, dubbing for the body, pre-stacked wings, pre-stacked collars, rubber legs and deer hair for the head.
Prep Materials Before Tying
Before laying out your materials (in the order they’ll be used), prep them to the extent possible. Some possibilities include:
— Taking the hooks you’ll need out of their packaging and laying them on the tying bench. Crimp the barbs before tying in case the hook point breaks off.
— Pull the dry fly hackle off the neck and strip the barbules from the base of the feather so that it is ready to be tied to the hook. Do this for as many flies as you intend to tie.
— Cut rubber legs to the length you want for tying (not necessarily the length they will end up at when the fly is finished) and then separate them. I’ve found 2″ to be a good length for tying Tarantulas. I then trim them to size when the fly is finished.
— If you use moose hair for dry fly tails, stack a big (not huge) wad of hair and wrap a rubber band around the butts. The rubber band will keep the tips aligned; dozens of flies can be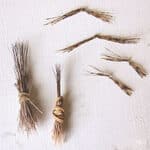 tied from one pre-stacked wad of hair. Simply trim a tails worth off the wad as needed.
— Pheasant tail hopper legs can be prepped by pre-knotting them. You can now buy hopper legs pre-knotted or do it yourself.
— Woolly Bugger/Streamer tails can be prepped by stripping the fuzzy marabou at the base of the stem.
— And so on.
Use Specialized Tools to Speed Things Up
— Use multiple hair stackers. Center a wine cork in the middle of six hair stackers and wrap duct tape around the outside of the stackers to hold everything in place. The resulting unit resembles the revolver of a six-shooter. The cap to a glass jar makes a nice lid.
Stack six wings, tails or whatever at a time. Or stack the wings and collars for three Tarantulas at a time (alternate wings and collars in the six-shooter).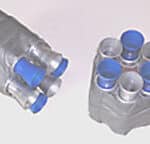
— Use a third hand (this is an A.K. Best tip). Glue a clothespin to small strip of wood and clamp the wood to your tying bench (a c-clamp works well for this). Use the clothespin to hold hair patches, krystal flash (or whatever) in place while you tie. Handier than it sounds.
— Use a toothbrush instead of a comb for cleaning hair. It is much more effective than standard fly-tying combs. Leash the toothbrush to your tying bench so it doesn’t fall on the floor or get misplaced.
Keep Your Tying Tools Organized
When using tying tools like whip finishers and bodkins strive to set them in the same place on your tying bench when not in use. Searching for tying tools is almost as bad as searching for tying materials.
Your tying scissors should be on your hand at all times when tying! They are used far too frequently to be constantly having to pick them up.